Introduction to Azure Virtual Machines

Azure Virtual Machines (VMs) are like your own personal computers, but they live in the cloud instead of on your desk. They're great if you need a lot of computing power and flexibility, but don't want to deal with the hassle of setting up and maintaining physical servers.
With Azure VMs, you can create and configure virtual machines with different operating systems, CPU and memory configurations, and other settings (highly configurable indeed). You can then use these VMs to run your applications and services. And the best part? You only pay for the VMs when you're actually using them, unlike your gym membership where you have to pay monthly, that's why I like orange theory.
Each VM is a fully isolated and secure environment that is configured with its own set of virtual hardware, including CPU, memory, storage, and networking resources. The size of the virtual machine is determined by the OS images and Data disk images. Azure VMs are billed at an hourly rate. A single instance VMs has an availability of 99.9% (with premium storage disks). Two instances deployed in the Availability Set will give you 99.95% availability and you can attach multiple managed disks to your Azure VMs.
Create an Azure VM
To create an Azure Virtual Machine (VM), you will need to perform the following steps:
Open up the Azure portal and sign in with your super secret Azure account. If you don't have an Azure account, go ahead and create one. It's like a gym membership, but for cloud computing. Yeah, you have to give your credit card info to Microsoft.
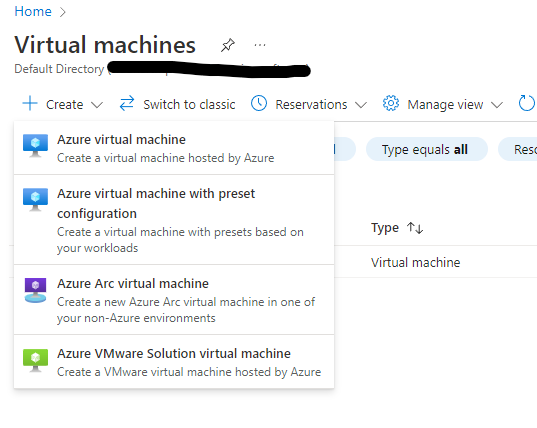
Enter "virtual machines" in the search or under services select Virtual machines.
Select "Azure virtual machine".
On the "Basics" tab, provide the following information:
Resource group: Choose an existing resource group or create a new one to hold the VM and other related resources.
Virtual machine name: Choose a unique name for the VM.
Region: Choose the region where you want to create the VM.
Image: Choose the image that you want to use to create the VM. You can choose from a range of pre-configured images or use a custom image.

On the "Size" tab, choose the size and configuration of the VM. You can choose from a range of sizes that have different combinations of CPU, memory, and storage. Don't worry, you can always change it later if you need more virtual horsepower.
On the "Settings" tab, configure any additional settings for the VM, such as networking, security, and extensions. You can also enable boot diagnostics if you want to see what your VM is thinking.
On the "Review+create" tab, review the configuration and click the "Create" button to start the deployment of your little virtual friend.
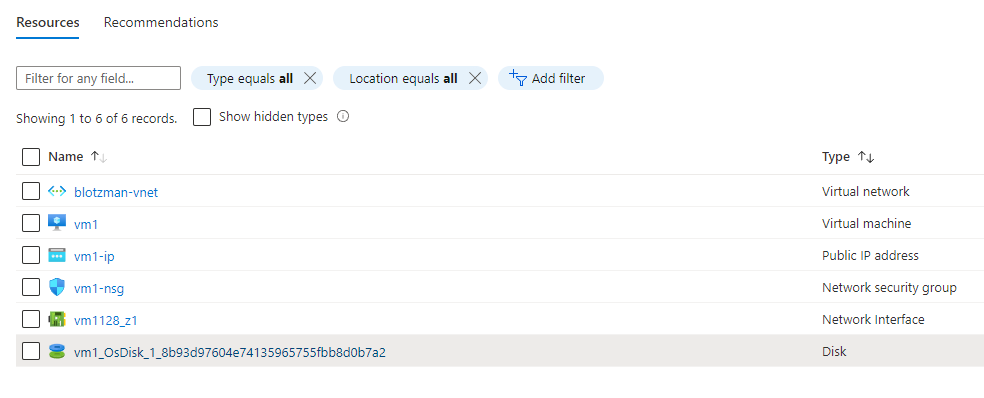
When you create a VMs, it creates multiple resources such as a Virtual network, Network security group (NSG), Network Interface etc. I created a VM with the name vm1, following are the resources get created.
Here are some web links from Microsoft to save your google search time:
Azure VMs Sizes
Azure VMs come in a variety of sizes that are optimized for specific cases. They are general purposes, compute-optimized, memory-optimized and GPU etc.
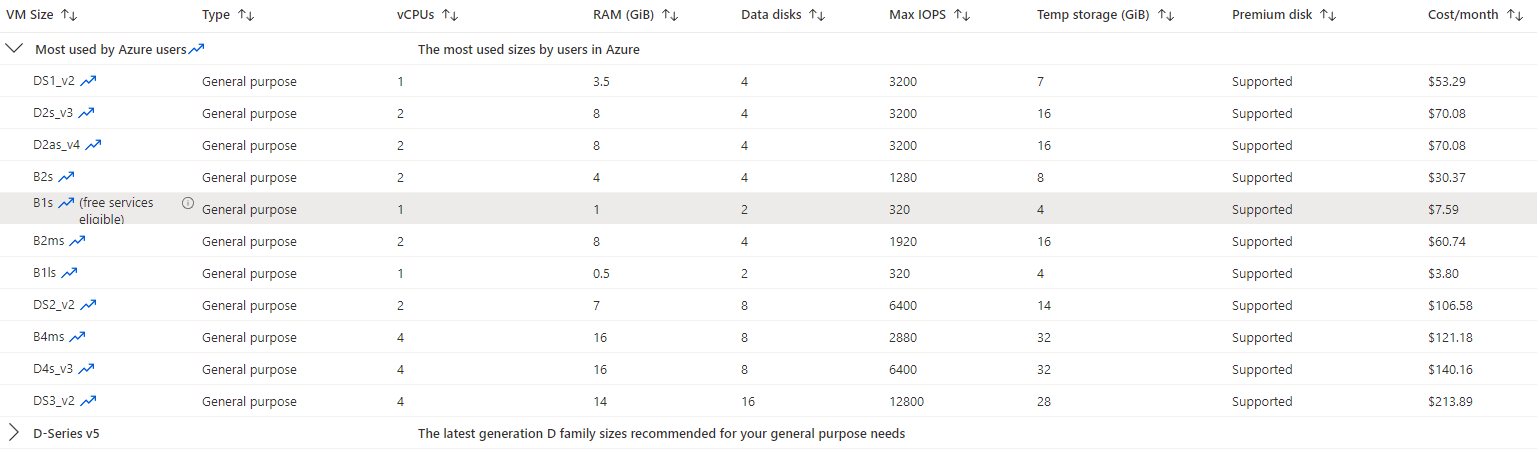
General purpose VM sizes are like the Goldilocks of computing - not too much CPU, not too little memory. They're just right for all your testing and development needs, as well as hosting small to medium databases and low to medium-traffic websites. Basically, they're the Toyota VMs and you will be pretty much using them every day.
Compute-optimized VM sizes are like steroids for your CPU - they'll give it a massive boost, but might skimp a little on the memory. They're perfect for medium-traffic websites, network appliances that need to process a lot of data, batch processes that can take advantage of all that extra CPU power, and application servers that need to handle a lot of requests. Basically, they're the muscle car of VMs."
The nice thing is you can check the cost of the sizes from the Azure portal. Here is the most frequently used:
Azure Compute Unit
Think of Azure Compute Units (ACUs) as the horsepower of your Azure Virtual Machines (VMs). ACU is currently standardized on a Small (Standard_A1) VM being 100 and all other SKUs then represent approximately how much faster that SKU can run a standard benchmark.
NIC (Network Interface)
NIC is used to connect a virtual machine (VM) to a virtual network, and it provides the VM with a unique private IP address that is used for communication within the virtual network. Imagine that a VM is like a tiny little computer that lives inside a bigger computer (which we call a "server"). The NIC is like a little door on the VM that opens up and connects the VM to the virtual network. And the virtual network is like a big highway that all the VMs can use to talk to each other. A VM can have one or more NICs, depending on its networking configuration.
Now, you might be wondering, "All sounds great, but what about security? How do I make sure that only the right VMs are talking to each other?" Well, that's where Network Security Groups (NSGs) come in.
NSG (Network Security Group)
A Network Security Group (NSG) is a virtual firewall that is used to control inbound and outbound network traffic to and from Azure resources. An NSG can be associated with a NIC to provide security for the VM that the NIC is attached to.
An NSG has a set of rules (protocol, port, and source or destination IP address) that specify which VMs are allowed to talk to each other, and which VMs aren't. You can think of these rules as a list of phone numbers that the NSG is allowed to call. If a VM tries to call a VM that isn't on the list, the NSG won't let the call go through.
To sum it up, a NIC is like a door that connects a VM to a virtual network, and an NSG is like a bouncer that controls which VMs are allowed to talk to each other.
Connect to an Azure Virtual Machine (VM)
There are several ways you can connect to an Azure Virtual Machine (VM):
Remote Desktop Protocol (RDP): You can use the Remote Desktop Connection client to connect to a VM using RDP. This is a good option if you need to interact with the VM's desktop environment. You will need to download the RDP file. Once you open the RDP file, you use the username and password during the creation of your VM in the Azure portal. RDP happens on port 3389 via TCP and UDP.
Secure Shell (SSH): You can use an SSH client to connect to a VM using the Secure Shell protocol. This is a good option if you need to run command-line tools or scripts on the VM. SSH happens at port 22 via TCP.
Azure Bastion: Azure Bastion is a service that enables you to connect to VMs using Remote Desktop Protocol (RDP) or Secure Shell (SSH) directly from the Azure portal.
So far hope you get a full-mind workout just by sitting at your computer and frantically trying to remember the azure services. The good part? You dont need to worry about wearing trendy workout clothes and dealing with judgmental gym-goers.